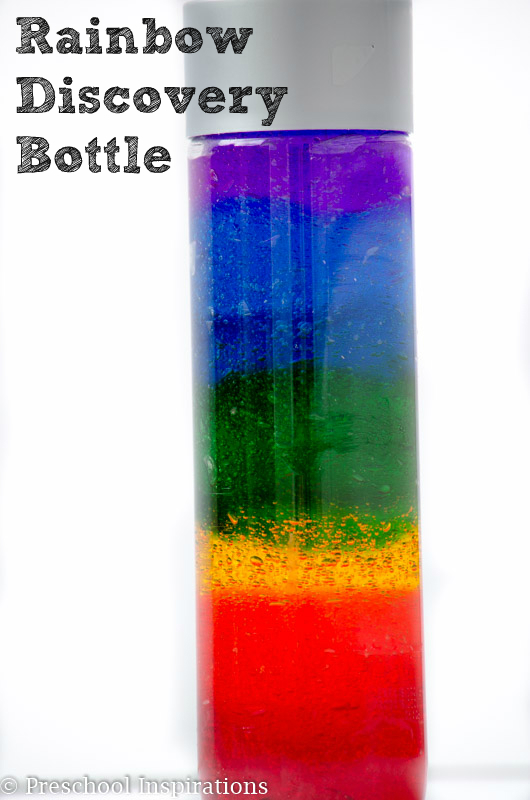
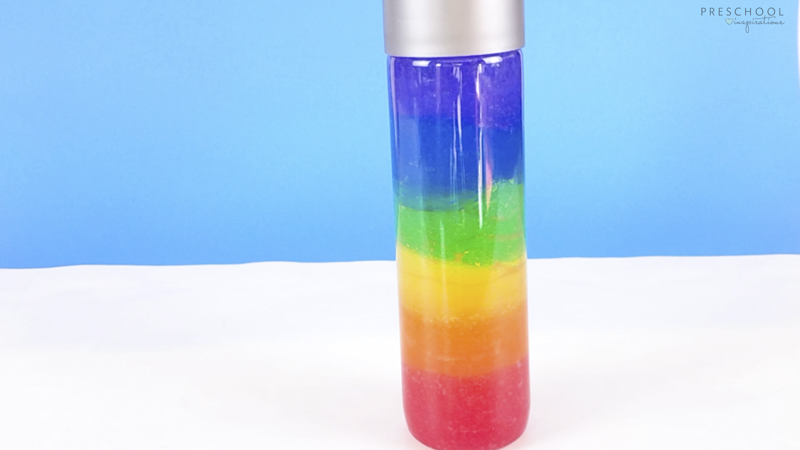
Want to make a rainbow sensory bottle that won’t mix together right away like a typical rainbow density bottle? This rainbow bottle is perfect, and we love using it for one of our favorite preschool themes: rainbows! Over time, the colors will mix and blend, but it can last for weeks or even months. To see more about all of our best sensory bottle tips and tricks, see our post about how to make the perfect sensory bottle.
This rainbow discovery bottle or rainbow sensory bottle is a perfect science activity for a rainbow theme, weather theme, or a St. Patrick’s Day preschool activity. But honestly, I think rainbows are best to study about any day of the year!
See our rainbow sensory bottle video below so you can quickly watch how to make one!

Get the best learning activities for 3-5 year olds at your fingertips
How to Make a Rainbow Sensory Bottle
We love the rainbow layers of this rainbow sensory bottle, and you can choose if you want to start with red or purple.
While most of my discovery bottles are really simple to make such as my alphabet sensory bottle or rainbow counting bears discovery bottles, this one takes a bit more time and patience. However, it’s fully worth it, and I’ll share my tips and tricks below!
Materials for Rainbow Sensory Bottle
- Sensory bottle – We love these water bottles or you can use a mini test tube-sized bottle or any other size
- Gel – Hair gel or aloe vera gel
- Coloring – liquid watercolor or food coloring in rainbow colors
- Sandwich-sized plastic bags
- Cup (optional, but it makes mixing a bit easier)
- Paper towels or a cloth
- Mini spatula
 or spoon
 - Glue such as super glue or craft glue (optional)
Here are some extra details about the materials.
- Sensory Bottle – You can use any size. I recently fell in love with the miniature ones that are test tube sized. Those are perfect for little hands. What we have pictured is a 16.9 fl. oz. VOSS plastic water bottle but since I first wrote this post, I love getting this bulk set of bottles for far less $$.
- Hair Gel or Aloe Vera Gel – Either of these are great choices, or you can do a combination of both. Sometimes hair gel comes in blue or purple already, and that saves on time because you won’t have to color those. Aloe Vera comes in green too, so that also makes things go quicker. I recommend getting extra clear gel because it can be easy to make blue and purple too dark. The Dollar Store is a great place for hair gel. To find aloe vera gel, it’s usually at a grocery store or a pharmacy store.
- Coloring –Liquid watercolor or food coloring works for coloring the gel. Although, liquid watercolor is easier to wash off if it gets on the skin. You can find it easily online through Discount School Supply or Amazon though. Some school supply stores and craft stores have recently started carrying them. I would call ahead before making a trip though! Another option is to make your own liquid watercolor! This DIY liquid watercolor recipe is super easy and works great for this recipe too.
Rainbow Sensory Bottle Directions
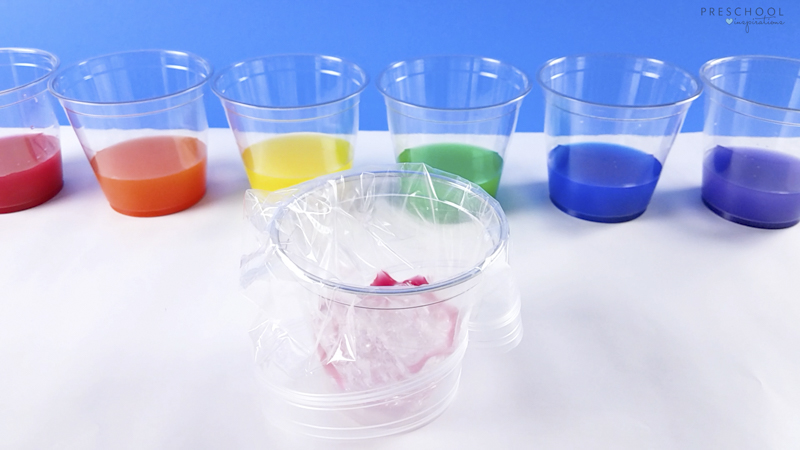
- Mix the clear gel into colored gel.
Put a plastic bag or piping bag inside a cup as pictured below. Mix the gel and coloring together to get a solid and even color. Make extra yellow and orange because those are the first colors to blend together after the bottle is made. Be sure to start off with a very light color when making red, green, blue, and purple. Otherwise, they might appear as black. This is also where having a pre-colored gel comes in handy.
For the larger sensory bottle, we used about 1/3 cup of gel for each layer and nearly 1/2 cup for yellow and orange.
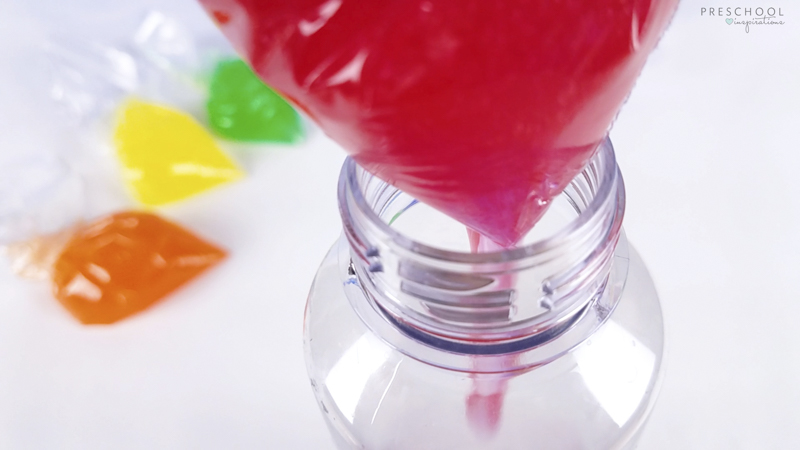
2. Transfer the colored gel to the sensory bottle.
You can begin with red or purple, whichever you prefer. Snip a hole at the end of the piping bag or sandwich bag. Squeeze the colored gel into the sensory bottle. The colored gel will get on the side of the bottle. Wipe it clean with a cloth or paper towel. For larger bottles, a mini spatula is helpful to push the paper towel inside far enough.
3. Continue adding the colors in rainbow order.
Repeat with each color until all colors have been used. Remember to use more orange and yellow because they are some of the first colors to blend into the colors around them.
4. Glue the lid on.
We recommend super glue to keep your sensory bottle nice and safe.
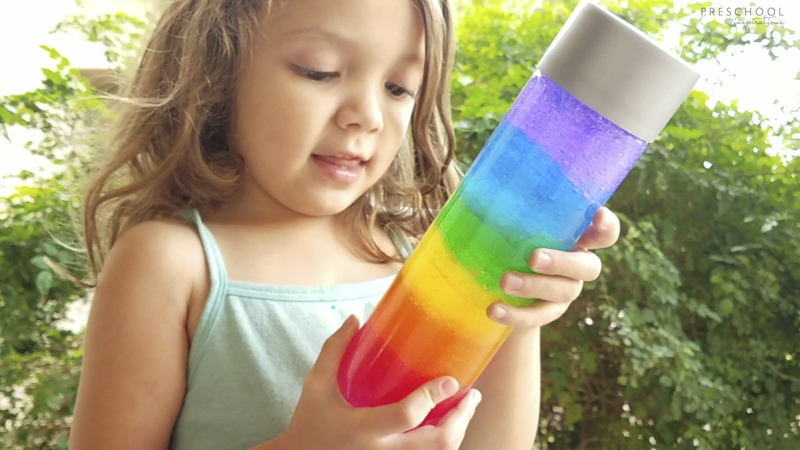
5. Observe and play with the rainbow sensory bottle.
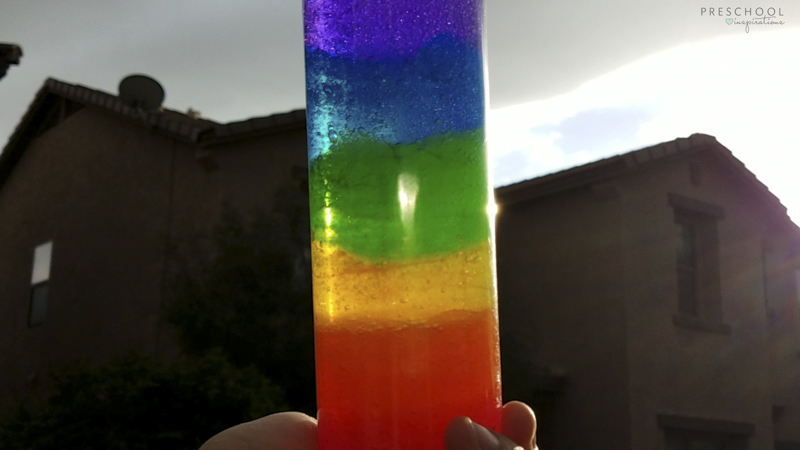
Yes, feel free to turn it upside down. That’s what makes this one so exciting and sets it apart from a rainbow-density bottle. I especially love using it in front of a window or near a light source such as a light table.
Rainbow Discovery Bottle Video
This rainbow sensory bottle is perfect to play with outside or inside.
We even put it on a light table.
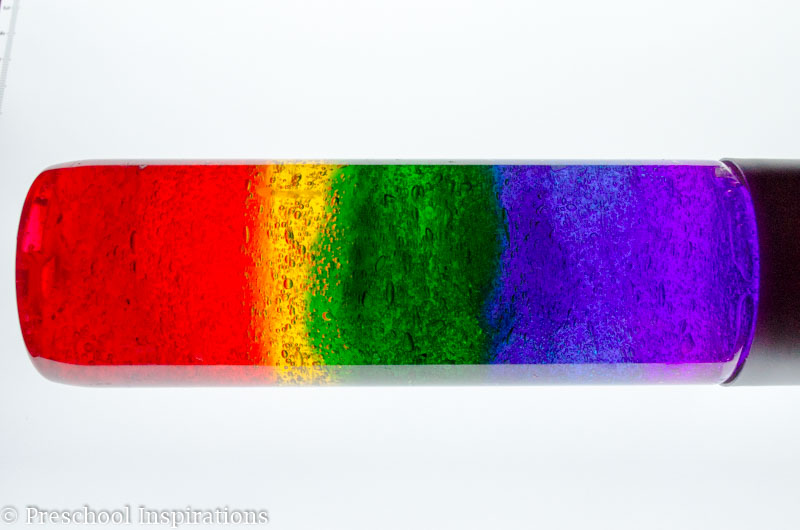
Now it’s a glowing rainbow!
These are also perfect to hold up to a window for some natural sunlight too!
After a couple of weeks, the colors will all start blending together, and it will eventually become just one color. But it’s fun to talk about that color-changing process as well!
My blogger friends have some more incredible ideas for discovery bottles and light play. Take a look at their incredible ideas too!
- Rainbow Bubble Beads Discovery Bottle | Modern Preschool
- Math Dominoes Discovery Bottle | Sugar Aunts
- Color and Light Discovery Bottle | Left Brain Craft Brain
- Phonics Discovery Dishes | One Time Through

Related Posts


- The Best Movement and Action Songs for Children - January 8, 2026
- Back to School Survival Guide for Preschool Parents - July 29, 2025
- Thanksgiving Ten Frame Counting Mats - November 17, 2024

I love this idea! It is almost time for school to start. Thank you for sharing
I hope your class loves it, Amy!
This looks cool! Just wondering what happened when you shook the bottle. Did all the colors mix? Did the colors separate?
Good question, Sara Ann! The gel is thick enough that it can be shaken. The colors will eventually blend, but it’s due to time more than anything. After having this for two months, I now have three colors left: red, green, and blue. It’s still looks beautiful even though some of the colors disappeared.
Suggestion, mix the colors IN the ziplock bags. It will save you the steps of mixing in the cup, then cleaning the cup for the next color.
Mary, I did originally try that, but the colors turned out much darker because a bag is so much thinner than a bottle or a glass. I love that you are thinking smarter, not harder. It’s definitely doable that way, but I wasted a lot of gel myself. Thanks for stopping by!
Hi,
Could I use glycerine to do my rainbow?? Would I get the same effect?
I’ve seen people make glycerin rainbows before, and they are beautiful! But they are really tricky to make and mix when shaken. This one is definitely much different (and easier)!
Do you leave any space near the top?
How do I know when a sensory bottle should have some space/air or not?
I made two trial mini ones last night and definitely made mistakes. Didn’t realize water would mix with the corn syrup! 😩
Hi Jaclyn, This sensory bottle isn’t made with corn syrup — just hair gel. And yes, fill this to the top since you don’t need to shake it. I have all of the details for making this in the post, so go ahead and read it carefully. Best of luck!
Do you know how to make a rainbow sensory bottle that will not mix and stay seperated even after being shaken?
If you fill this to the top of the bottle, it can be shaken. But it will naturally mix after about a week. Other than this, I haven’t seen anything that stays rainbow that is liquid. Maybe someone will invent one someday :).